Act! Scheduler
![]()
Have you ever set an alarm to wake you up, but you still wake up every hour to check the time, just anticipating that the alarm won’t work? Yeah, me too. Just this weekend actually. When you rely on your database to manage your business, you’d probably sleep a bit more soundly knowing it’s backed up and well maintained. We have a way you can automate the process, AND have confirmation that things are working.
The Act! Scheduler is a program that runs independent of your core Act! program, that allows you to schedule your backups, maintenance, and if you are a remote users – synchronization. If you setup the E-mail Alerts, the scheduler sends confirmation your tasks ran, or notice if there was an issue. If you want the e-mail alerts, you’ll need your SMTP server name & account login information. Be sure to have that prior to setup. If unsure of that information, contact your e-mail hosting provider or IT support.
Act! E-mail Alerts
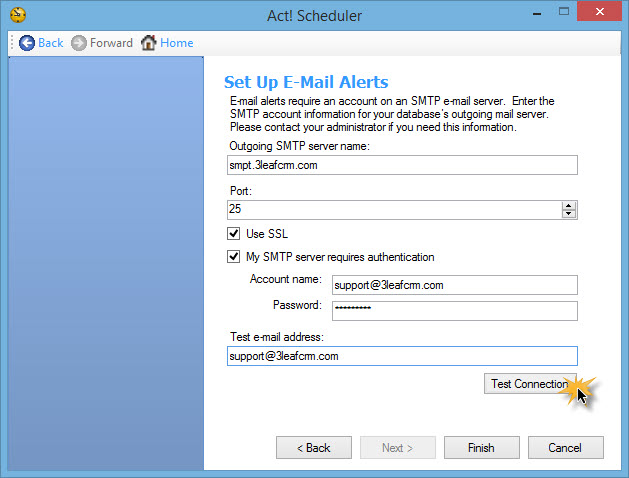
If you do want the e-mail alerts, for the peace of mind, set that portion up first.
- Click the Start button
- Choose All Programs (If using Windows 8/8.1, click the Start button and search for Act! Scheduler)
- Act! Scheduler opens to the settings screen, select Set Up E-mail Alerts

- Complete the form
- Click Test Connection to ensure all is set correctly
Scheduling Database Backup
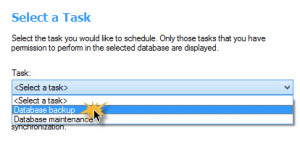
- Click Create a task
- Click Browse to & select your database (if you are a 3Leaf CRM customer, it should be in C:Act Data)
- Enter your user name & password, then click Next
- Select Database backup as the Task, then click Next
- Click Browse to set the database backup location (If backing up on a server, coordinate with IT to include your Act! backup in their server backup routine.)
- Select the number of backup files to keep, the default is 5.
- Select when and how often the backup runs. We suggest daily at a time when the users
are out of the database
- If you selected to setup E-mail Alerts, enter the e-mail address to which backup notifications should be sent


Scheduling Database Maintenance
- Repeat steps 1 – 3 in the previous section
- Select Database maintenance as the Task, then click Next
- Choose the maintenance options, we recommend selecting both
- Click Next
- Set the schedule, for maintenance, we recommend weekly, after your daily backup
- Enter the e-mail address for notifications
- Click Finish
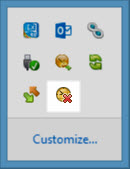
You’ll receive e-mail messages keeping you in the loop on it’s tasks. If you ever want to peek in on the status of your Scheduler, you can look in your System Tray. If all is good to go, you will see the Scheduler icon. The Scheduler will have a red “X” on it if the service has stopped.
Act! scheduler is now set to backup and keep your database healthy. Sweet dreams!